Yesterday here in Tucson was the local Susan G Komen Race for the Cure. For the past 2 yrs, I have volunteered with this magnificent organization. My mom is a Breast Cancer Survivor of 10 years, so this is very close and dear to my heart.
This past year, my bowling teammate and good friend, was diagnosed with Breast Cancer. She found the lump herself. She has undergone chemotherapy which has done some horrible things to her body .... loss of hair, fingernails that are popping off, swelling of the lymphatic system , and the list goes on. This past Friday, she finished her last does of Radiation treatment. Almost her entire family and friends .... me included .... walked with her in this fight against Breast Cancer. I have done the Susan G Komen Breast Cancer 3-day twice in the past (2007 and 2008) and I'm hoping to do it again this year seeing that I wasn't able to walk it last year. It is 60 miles in 3 days... and yes, this body has done it twice. It is the most emotional event that I have ever done and hope to do many times over.
So walking yesterday was an event in itself. I set both of the alarms on my clock so I could get up in time and get to my friends home. 5am and 5:30 am. ...... and you guessed it... I didn't hear either one of the alarms at all. I awoke around 3:30 am and went back to sleep... so I must have been sleeping really hard. I awoke suddenly ... looked at my clock and saw it was 6:30. The race starts at 8am. But that meant I needed to shower and dress and get to the shuttle parking lot , so I could get to the event and register. I know, I know, I know... I should have registered long time ago... but I procrastinated. But I made it with minutes to spare. I had laid my clothes out before I went to bed... but I awoke to finding only one sock. I know Alexsis nabbed it while I was sleeping. BAD Dog!!!
I don't know what the final head count was of all of those walking yesterday, but its a sight to see. If you've not done one before, I urge you to do so. My friends hubby has not walked in a long time. Although we all started off as a family and group, Vickie needed to walk a bit faster so that she could make it to the end of the 5K race. I lagged behind with Dave to make sure that he did make it with no problems. I'm a proud member of the "no one left behind club". He made it to the end (3.1 miles is a long walk for someone that doesn't walk at all) and has vowed to continue to walk to get back into shape.
Monday, April 12, 2010
Saturday, April 10, 2010
I'm Beary Sorry
I had decided to take some lessons on coloring with Copics. I had stumbled upon this blog called Simply Scrapping. You can find it here. Since I've invested a lot of money in these, I need to start using them. Instead of doing my laundry... I'm sitting here coloring. How much fun is this!!!
I'm behind in getting started with the tutorials since they are now on lesson 5 ... and I'm just doing lesson 1.. Time does seem to fly when you're busy doing other things.
I have lots to learn, but I'll get there.
So, I printed off the image that was given for the first class. I was able to find 3 colors that were 2 degrees away from each other and went to work. This lesson was on blending and I've got some practicing to do. But for a first time in using them this way, I don't think I did a bad job. Ok... who am I fooling. LOL!
Turned it into a card. Cut the bear out and pop-dotted it onto another image.
I'm behind in getting started with the tutorials since they are now on lesson 5 ... and I'm just doing lesson 1.. Time does seem to fly when you're busy doing other things.
I have lots to learn, but I'll get there.
So, I printed off the image that was given for the first class. I was able to find 3 colors that were 2 degrees away from each other and went to work. This lesson was on blending and I've got some practicing to do. But for a first time in using them this way, I don't think I did a bad job. Ok... who am I fooling. LOL!
Turned it into a card. Cut the bear out and pop-dotted it onto another image.
Recipe:
Copic Sketch markers E55, E57 and E59
Rhinestones
DCWV Indian Summer stack
GP Cardstock 110 lb wt.
Wrights Prestige Ribbon
Thursday, April 8, 2010
What is Red Velvet and Silver and You've Got to have it?
Theres some wonderful things going on the Cuttlebug Challenge blogspot. Go on over to the Cuttlebug Challenge and enter to win a Cricut Cake and othe prizes.
http://cuttlebugchallenge.blogspot.com/2010/04/what-is-red-velvet-and-silver-and-youve.html
A Card to Celebrate
I've had this stamp for a while and I can't tell you where I got it from, but I believe it was from one of the stamping expos that I went to a few years back. I wish that vendor would come back so I can get more of these stamps.
I used the Gemstone cardstock from Joann's, some sheer ribbon that I had on hand and colored the image with my pearlescent inks. I used the Marvy liquid Applique on the hair. I cut the image out and pop-dotted it ontop of another image.
Recipe:
Rhinestones
Sheer Ribbon
Black Liquid Applique
Studio G Stamp - Celebrate, Series 46
Gemstones cardstock
Gold Lame' Smooch ink
Pearlescent Inks: Silver Moss, Sundown Magenta,, Waterfall Green
Tuesday, April 6, 2010
A Recipe Book ala Kathy Orta Style
While searching some of my favorite blogs today, I stumbled upon another fine tutorial and videos by Kathy Orta of Paperphenomenon . She does some great stuff and I draw inspiration from her all the time. She's been showing how to do mini books of all sorts and I've been intrigued and bitten to do a few.
A few days ago, she did this Cupcake box . Please check out her blog for detailed instructions and dimensions necessary to make one of your own. So tonite, I sat down, pulled out my chipboard, some colorful papers and went to work.
I had bought some 12" x 24" from my local hangout, Michael's, a while back. It's a designer paperpad by K&Company. It has a glossy finish to it. I originally bought it so that I can make some larger purses using my Cricut machine, but hadn't gotten around to it. While watching the video, Kathy pieced together 2 pieces of paper so she'd have the correct length for this box. But since I had this paper on hand, I decided to give it a go.
I embellished the book with a layered flowered that I cut with my cricut using Plantin Schoolbook. I used a Velcro Hook and Loop circle and adhered it to the flap for closure.
I then made my own recipe cards to go in the envelopes. I hand drew the lines on the back of the cardstock and added matching tags.
A few days ago, she did this Cupcake box . Please check out her blog for detailed instructions and dimensions necessary to make one of your own. So tonite, I sat down, pulled out my chipboard, some colorful papers and went to work.
I had bought some 12" x 24" from my local hangout, Michael's, a while back. It's a designer paperpad by K&Company. It has a glossy finish to it. I originally bought it so that I can make some larger purses using my Cricut machine, but hadn't gotten around to it. While watching the video, Kathy pieced together 2 pieces of paper so she'd have the correct length for this box. But since I had this paper on hand, I decided to give it a go.
I embellished the book with a layered flowered that I cut with my cricut using Plantin Schoolbook. I used a Velcro Hook and Loop circle and adhered it to the flap for closure.
I then made my own recipe cards to go in the envelopes. I hand drew the lines on the back of the cardstock and added matching tags.
Here is the box opened with the cards sticking out.
Recipe:
K & Company 12" x 24" Paper Pad
Chipboard
Envelopes from Michaels
Tacky Tape
Scotch Quik-dry Adhesive
Plantin Schoolbook for the flower
Bazzill cardstock for the recipe cards
Miscellaneous Rhinestone (from my stash)
Velcro Hook and Loop Circles
Thursday, April 1, 2010
Wacom Bamboo Craft Pen and Touch Pad
Ok.. I confess. I'm a tool junkie. No, I don't have one of these yet... but I think it would be fun to have.
A fellow scrapbooker here in Tucson has one to give away on her blog.
Go check out her website. She comes up with some interesting things.
http://www.confessionsofacropaholic.com/
A fellow scrapbooker here in Tucson has one to give away on her blog.
Go check out her website. She comes up with some interesting things.
http://www.confessionsofacropaholic.com/
I'm really feeling special!!
I just received another blog award from a Cricut messageboard member ... Alice. Thank you so much!
Please take a look at Alice's blog...http://alicebrowncreations.blogspot.com/ ..... for she's been having lots of fun with the newest cricut cartridge.... Once Upon a Princess!
So I'm passing this award on to the following people:
Ms. Dee
Sanurascraps
Yaya
Myra
scrapsation
TraciVee
Please click on their names , which will take you to their blogs and see their fantastic work!
Please take a look at Alice's blog...http://alicebrowncreations.blogspot.com/ ..... for she's been having lots of fun with the newest cricut cartridge.... Once Upon a Princess!
So I'm passing this award on to the following people:
Ms. Dee
Sanurascraps
Yaya
Myra
scrapsation
TraciVee
Please click on their names , which will take you to their blogs and see their fantastic work!
Wednesday, March 31, 2010
Glass Etching with the Cricut
Right after the holidays, I made a tip mug for the bartender at the bowling alley. During a nite of who knows what, a customer broke her tip glass. She was using a hand cut bottle (Grey Goose... lol) ... but I thought I could do something nicer for her. Since it's a bowling alley, I found an image of a bowling ball and added her name to it. She practically cried when I gave it to her. It's been a walking ( or should I say bar standing) advertisement for me. Lots have inquired on purchasing one, but with the economy .... folks want everything cheap. And no, I'm not going to cheapen my work. I just did a customer request... and he was a happy camper. Had her to wash it out and filled it with his favorite brew. I approached him as I was leaving, and his SO stated how elated he was. He couldn't stop talking about it.
Now wouldn't you know it, I didn't take pictures of either one. How bad of me for not snapping a picture before I gave them to the recipients. I will have to take a picture of the bartenders next week when I go in to bowl.
Word of wisdom, get your money upfront when doing special orders. I did 4 mugs during the holidays, and they are still riding around in the trunk of my car. I called the guy that wanted them 2x and left messages. Made numerous trips to the store and have not seen him there, although I was told in so many words that he still worked there. One was for his manager. I have no use for the mugs since they were personalized, so I may just go and give the manager his mug. Never know... he might give me a discount on some other glassware for me to decorate.
Here are a few snapshots of some of the glasses that I have done.
Now wouldn't you know it, I didn't take pictures of either one. How bad of me for not snapping a picture before I gave them to the recipients. I will have to take a picture of the bartenders next week when I go in to bowl.
Word of wisdom, get your money upfront when doing special orders. I did 4 mugs during the holidays, and they are still riding around in the trunk of my car. I called the guy that wanted them 2x and left messages. Made numerous trips to the store and have not seen him there, although I was told in so many words that he still worked there. One was for his manager. I have no use for the mugs since they were personalized, so I may just go and give the manager his mug. Never know... he might give me a discount on some other glassware for me to decorate.
Here are a few snapshots of some of the glasses that I have done.
Buzzed and Tipsy Wine Glasses
Personalized Coffee mug
Personalized Chicago Bears Beer Stein
U of A Beer Stein
Sunday, March 28, 2010
A First for Me!!!!
Wow! I received a blog award! I feel so special.
Thank you Audrey for this special award. You can see her awesome work at http://cuteandsome.blogspot.com/ . She does some really neat and creative things.
Saturday, March 27, 2010
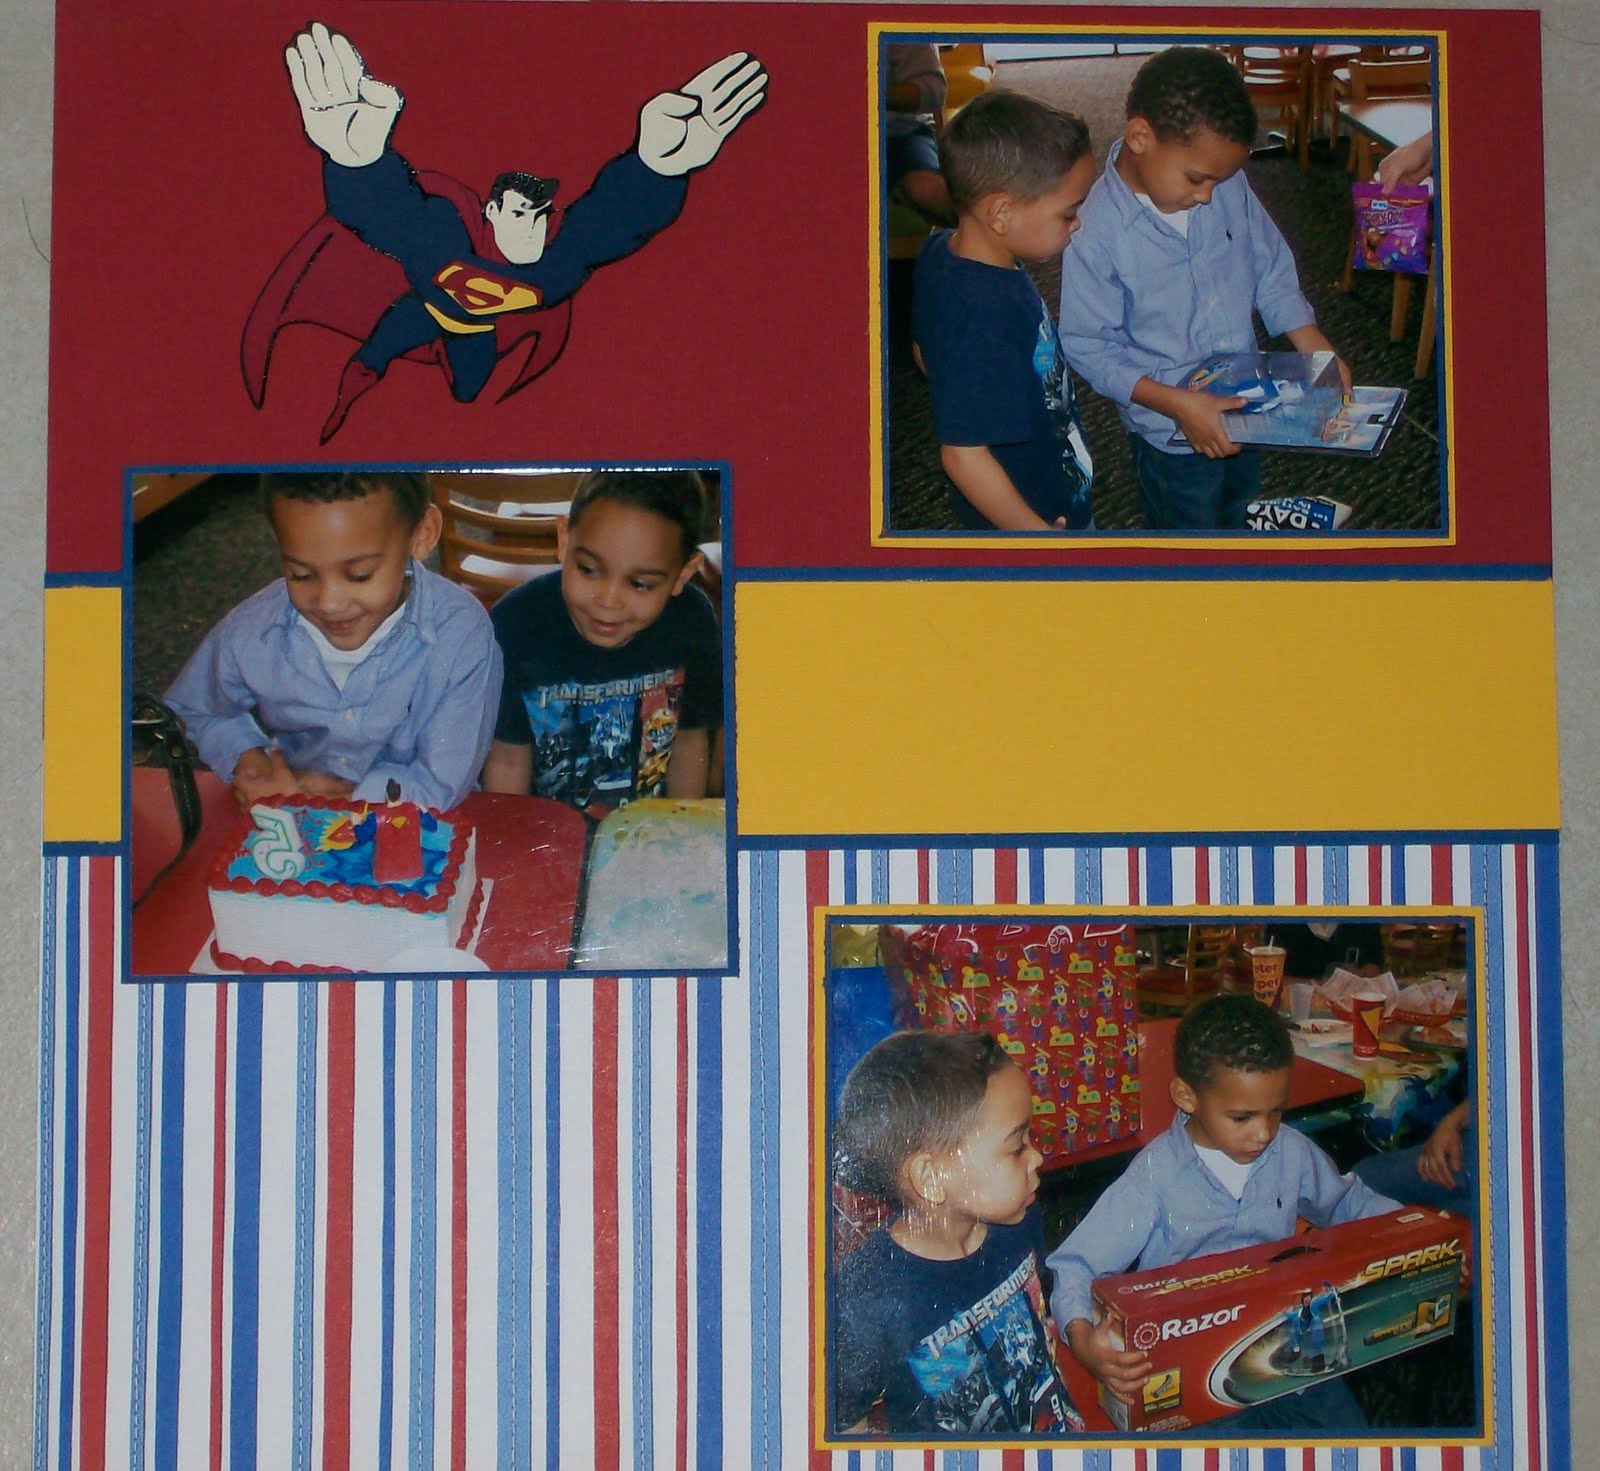
A Superman Layout
I've not done any layouts in a while and I'm really behind in scrapbooking all of my pictures. At this rate, I'll never catch up. Hopefully, my unemployment will be ending soon and I can become a productive working citizen once again. But in the meantime, I'll continue to do my crafting.
I had printed these pictures of my grandson's 5th birthday party and they were staring at me saying... please make a layout and put them in my book. LOL! So I did. It still needs the journaling done, but I didn't want to post all of that on here for the world to see.
I got an SCAL image of superman from http://mardenz.blogspot.com/ and pieced him out. Not a bad job.
I used Disney Hannah Montana Cricut Cartridge for the wording. It was pop dotted off the page. I used my Signo white pen and drew in some lines for a bit of an effect.
Paper used was Bazzill card stock and the patterned paper .... I believe was a Making Memories paper (4th of July). It went very well with the color theme.
I had printed these pictures of my grandson's 5th birthday party and they were staring at me saying... please make a layout and put them in my book. LOL! So I did. It still needs the journaling done, but I didn't want to post all of that on here for the world to see.
I got an SCAL image of superman from http://mardenz.blogspot.com/ and pieced him out. Not a bad job.
I used Disney Hannah Montana Cricut Cartridge for the wording. It was pop dotted off the page. I used my Signo white pen and drew in some lines for a bit of an effect.
Paper used was Bazzill card stock and the patterned paper .... I believe was a Making Memories paper (4th of July). It went very well with the color theme.
Thursday, March 25, 2010
A Blinged Up Purse
I just love these little boxes that I picked up in the Dollar Bins at Michael's. They have so much potential. It's another late night where I'm not sleepy just yet, so I pulled out my paints and went to work.
I used a light purple Pearlescent ink paint and painted the entire box. Replaced the elastic to some white elastic and added some rhinestones. I used Fabric Tac glue to glue them in place. I was amazed at how fast it dried. And of course, it needed some straps, so I made some small holes with my cropodile and added some small purple eyelets. The ribbon added just the right touch needed.
I'm sure any young girl would love to have this in her collection.
I used a light purple Pearlescent ink paint and painted the entire box. Replaced the elastic to some white elastic and added some rhinestones. I used Fabric Tac glue to glue them in place. I was amazed at how fast it dried. And of course, it needed some straps, so I made some small holes with my cropodile and added some small purple eyelets. The ribbon added just the right touch needed.
I'm sure any young girl would love to have this in her collection.
Wednesday, March 24, 2010
True Friend Card using the Wedding Cartridge
Another late nite of not feeling sleepy, so I decided to work on some more cards and other thinkgs. I'm crocheting another baby blanket to go with a baby dress and cap that I recently finished to donate to my Michael's charity group, so I worked on that for a few while watching The Biggest Loser and part of American Idol.
I bought a new EK Success Punch today with some bowling winnings and decided to make a card to send to a True Friend.
I made a border for the card and added a flourish from the Cricut Wedding Solutions Cartridge. I cut it at 2 inches using the blackout feature and also the regular cut for layering. I pop-dotted the flourish off the card for a nice dimentional look.
Fiskars came out with some new acrylic stamps which I'm really liking. There is a big background stamp, flourishes and words... 17 stamps total. The words "True Friend" came from this set. It has lots of potential and I have an idea of another card feature that I plan to work on this week.
The paper used for this card was DCWV Whimsy stack (patterned paper) and the newer DCWV Natural Stack (off-white cardstock)a. The colors went very well together. I inked all edges with Tsukineko chalk ink in Pixie Dust. The words were inked with Tsukineko Brilliance Pigment ink in Pearlescent Poppy and then heat embossed with Ultra Thick embossing powder.
Here's a picture of the fiskar punch:
I bought a new EK Success Punch today with some bowling winnings and decided to make a card to send to a True Friend.
I made a border for the card and added a flourish from the Cricut Wedding Solutions Cartridge. I cut it at 2 inches using the blackout feature and also the regular cut for layering. I pop-dotted the flourish off the card for a nice dimentional look.
Fiskars came out with some new acrylic stamps which I'm really liking. There is a big background stamp, flourishes and words... 17 stamps total. The words "True Friend" came from this set. It has lots of potential and I have an idea of another card feature that I plan to work on this week.
The paper used for this card was DCWV Whimsy stack (patterned paper) and the newer DCWV Natural Stack (off-white cardstock)a. The colors went very well together. I inked all edges with Tsukineko chalk ink in Pixie Dust. The words were inked with Tsukineko Brilliance Pigment ink in Pearlescent Poppy and then heat embossed with Ultra Thick embossing powder.
Here's a picture of the fiskar punch:
And here's the card and closeup details:
Recipe:
EK Success Edger Punch - Fancy Flight
Fiskars Acrylic Stamps - Bold Flowers
DCWV Natural Stack - Off-white cardstock
DCWV Whimsy Stack - Patterned Paper
Tsukineko Brilliance Pigment Ink - Pearlescent Poppy
Tsukineko Versa Magic Chalk Ink - Pixie Dust
Cricut Wedding Solutions Cartridge - Flourish
Tuesday, March 23, 2010
Ok... this isn't anything crafty, but.............
I had to share a few things that happened to me today.... well tonite actually. I bowl on Tuesday nites... no I didn't roll a coveted 300. LOL! On the way home from the bowling alley, I am in my neighborhood..... approximately 2 miles from my house. I get to the stop sign... its a 4 way stop.... and I notice to my right... there are 2 cars stopped, but not at the end of the street to go either right or left. I wait for the car across from me to turn down that street. Just as I safely proceed across the street, I look to the right to see that one of the cars that is stopped... the car door is open ... and then I notice these 2 people are fighting. Whew! Not in my neighborhood. This is a nice neighborhood.... what the heck is up with that.
So, I'm on my cell phone chatting with a friend.... yes, I was talking on the phone while driving.... shoot me. LOL! I was finding out whether she was going scrapbooking tomorrow as we had planned. I stopped in mid-sentence to say whoa.... there are people fighting in the middle of the street. Whew!
Ok... enough of that.
I get home and I'm a little hungry. I know there is a leftover piece of chicken in there... then I see the remainders of the spanish rice and beans. Its in this cup. So I take and loosen the saran wrap and place it in the microwave for 2 minutes. The timer goes off and I go back to get my food. I open the microwave to see.... LOL! ...... the cup has shrunk... like those shrinky dink papers. Whew! I shoulda took a picture of that before I took everything out of the microwave. But at least it wasn't an egg that I tried to boil in the microwave like a friend of mine did .... bawhahahahaha... I'm crying now thinking about it. Boy, she's never going to tell me any of her secrets again.
Lawd help me. I will have to make sure she sees this post. So, here's the cup.
So, I'm on my cell phone chatting with a friend.... yes, I was talking on the phone while driving.... shoot me. LOL! I was finding out whether she was going scrapbooking tomorrow as we had planned. I stopped in mid-sentence to say whoa.... there are people fighting in the middle of the street. Whew!
Ok... enough of that.
I get home and I'm a little hungry. I know there is a leftover piece of chicken in there... then I see the remainders of the spanish rice and beans. Its in this cup. So I take and loosen the saran wrap and place it in the microwave for 2 minutes. The timer goes off and I go back to get my food. I open the microwave to see.... LOL! ...... the cup has shrunk... like those shrinky dink papers. Whew! I shoulda took a picture of that before I took everything out of the microwave. But at least it wasn't an egg that I tried to boil in the microwave like a friend of mine did .... bawhahahahaha... I'm crying now thinking about it. Boy, she's never going to tell me any of her secrets again.
Lawd help me. I will have to make sure she sees this post. So, here's the cup.
Altered Boxes
While browsing at my local hangout.... LOL! ... Michael's, they were restocking the $ bins and putting in all sorts of neat things. Those little $ items add up quickly, so you have to be really careful or you can spend $100 on those little items in no time.
They had these cute little boxes and I wasn't going to get any, but decided to pick up 2 of the 3 styles they had. I think I'll go back and get some more because I can see these used for little gifts.
I took the knobs off of them and painted them with Pearlescent paints for a little glimmer.
I covered them with DCWV papers from the Safari stack (butterfly print) and Saffron stack (loved the colors). I then punched small holes in the tops with my cropodile and added eyelets so I run ribbon thru them.
The little tube purse has a small piece of letter to go around the knob for closure, but I'm going to run out and get some colored elastic since that piece of leather doesn't hold too great.
The other purse had some elastic on it, but it didn't match after I covered it with that gorgeous butterfly paper, so it will get some new elastic as well. I tried several things as a closure, but they weren't working for me.
On the larger purse, I used the Disney Hannah Montana Cricut Cartridge and cut out the butterfly. I layered it and glued it down, adding a little rhinestone in the middle of it. It will hold a cell phone and a few other necessities. I'm thinking my friends daughters might like this for when they are hanging out with friends and just a few items vs a large handbag.
Forgot to take pictures of the round tube before it was altered, and remembered when I had disassembled the larger one. So, it went from this......
They had these cute little boxes and I wasn't going to get any, but decided to pick up 2 of the 3 styles they had. I think I'll go back and get some more because I can see these used for little gifts.
I took the knobs off of them and painted them with Pearlescent paints for a little glimmer.
I covered them with DCWV papers from the Safari stack (butterfly print) and Saffron stack (loved the colors). I then punched small holes in the tops with my cropodile and added eyelets so I run ribbon thru them.
The little tube purse has a small piece of letter to go around the knob for closure, but I'm going to run out and get some colored elastic since that piece of leather doesn't hold too great.
The other purse had some elastic on it, but it didn't match after I covered it with that gorgeous butterfly paper, so it will get some new elastic as well. I tried several things as a closure, but they weren't working for me.
On the larger purse, I used the Disney Hannah Montana Cricut Cartridge and cut out the butterfly. I layered it and glued it down, adding a little rhinestone in the middle of it. It will hold a cell phone and a few other necessities. I'm thinking my friends daughters might like this for when they are hanging out with friends and just a few items vs a large handbag.
Forgot to take pictures of the round tube before it was altered, and remembered when I had disassembled the larger one. So, it went from this......
to this......
Recipe:
Wooden boxes from Michael's
DCWV Safari Stack
DCWV Saffron Stack
Rhinestones
Eyelets
Ribbon (from my stash)
Disney Hannah Montana Cartridge
I think I might go back and embellish them a little bit more.
Sunday, March 21, 2010
Wedding Card - Easel Style
A very good friend of mine is getting married tomorrow evening in a small ceremony with family. Being that I'm a good friend (LOL!) , I am invited and promised not to take full length pictures. I fell in love with this wedding paper and thought it would be a nice background. Since this is both of their second marriages, I thought an off-white would be a good choice of color.
I used the Cricut Wedding Solutions Cartridge for the Bride and Groom cut at 4 1/2". I layered the clothing and pop-dotted them out on the card. Cardstock used was Bazzill white for the bride and DCWV Shimmer stack for the grooms tux and the accents on the bride. I cut strips of ribbon and layered it under the dress for a nice effect , along with using the ribbon on top of the veil. I accented the veil and the dress with pearls.
On the inside of the card, I used a Martha Stewart Heart Border punch and accented the hearts with crystal rhinestones. I inked the edges with ColorBox chalk cats eye in Creamy Brown.
The sentiment is one I found on the internet.
I used the Cricut Wedding Solutions Cartridge for the Bride and Groom cut at 4 1/2". I layered the clothing and pop-dotted them out on the card. Cardstock used was Bazzill white for the bride and DCWV Shimmer stack for the grooms tux and the accents on the bride. I cut strips of ribbon and layered it under the dress for a nice effect , along with using the ribbon on top of the veil. I accented the veil and the dress with pearls.
On the inside of the card, I used a Martha Stewart Heart Border punch and accented the hearts with crystal rhinestones. I inked the edges with ColorBox chalk cats eye in Creamy Brown.
The sentiment is one I found on the internet.
Recipe:
Bazzill White Cardstock
DCWV Shimmer Stack
Wedding Paper by
American Crafts Brown ribbon (Cardfront)
Prestige Sheer Ribbon for Dress and Headdress
ColorBox Chalk Cats Eyes - Creamy Brown
Pearls
Rhinestones
Saturday, March 13, 2010
Happy Easter Bunny Baskets
I'm trying to be ahead of the game in creating my Easter gifts. While out shopping at Dollar Tree, I stumbled upon these little wooden boxes. I passed them up the first time, but went back the next day to get them. I thought of what I could use them for and went on a mission. In browsing the Cricut MB, there have been a few pictures of Easter bunny cards. So I decided to try my hand at creating my own bunny in Cricut Design Studio . Here is my rendition of my version of Easter Baskets to give to my grandson and some other children that I simply adore.
I used lots of different cartridges to create this basket as follows:
George and Basic Shapes was used to create the bunny, the nose and the carrot
Ashlyn's Alphabet was used for the white sign
A Child's Year was used for the "Happy"
Paper Pups was used for the "Easter"
Paper Doll Dress Up was used for the carrot top
I changed out the ribbon and used some American Crafts Easter Ribbon. The bunny butt was made from Pebbles, Inc. Pom Poms. I embossed the bunny ears with a cuttlebug folder. The bunny was inked with Tsuneiko Chalk inks.
I used lots of different cartridges to create this basket as follows:
George and Basic Shapes was used to create the bunny, the nose and the carrot
Ashlyn's Alphabet was used for the white sign
A Child's Year was used for the "Happy"
Paper Pups was used for the "Easter"
Paper Doll Dress Up was used for the carrot top
I changed out the ribbon and used some American Crafts Easter Ribbon. The bunny butt was made from Pebbles, Inc. Pom Poms. I embossed the bunny ears with a cuttlebug folder. The bunny was inked with Tsuneiko Chalk inks.
Recipe:
Wooden box from Dollar Tree
Bazzill cardstock
George and basic shapes
Ashlyn's Alphabet
A Child's Year
Paper Pups
Paper Doll Dress Up
American Crafts Ribbon
Pebbles, Inc Pom Poms
Googly Eyes
Tsunieko Chalk Inks
Tuesday, March 9, 2010
St. Patrick's Day Card
I decided to have a little fun with this card. Decided to make it ethnic and female at that. LOL! If you can't have fun with the things that you do, then you don't need to do them.
Recipe:
Bazzill Bling in Green, Gold and Black
KI Memories Patterned Paper - Daydream Stack
Cricut Cartridge - Paper Doll Dress Up for Leprechaun
Cricut Cartridge - Jasmine for phrase on front of card
Green Rhinestones
Monday, March 8, 2010
Birthday Card - Full Front Tri-fold Shutter Style
I've been on a card kick lately. I'm trying to get my stash built up, so that when the need arises, I will have cards ready to choose from. This is another Tri-fold Shutter card, but with a full front. You can get the directions on how to make one from here... Tri-Shutter Full Front Card
Recipe:
DCWV Spring Glitter Stack Patterned Paper
Gemstone Bling Papers in Gold and Blue
Charms from Michael's Jewelry
Stamps - Cloud 9 Happy Birthday
Subscribe to:
Posts (Atom)