I Said I Wouldn't Do This!

Ok, I was talked into creating a blog to showcase my creativity. I have been resisting this for far too long, but now is the time to finally get the ball rolling.

So here goes. Come with me on my journey into creativity.

Sunday, July 25, 2010

A Weekend of Card Making

In browsing through my stamps and images, I decided I needed to work on some Copic coloring.  Although I didn't do any blending techniques, I got a lot of cards colored up  and ready to be put on cards.  I had joined a birthday card swap and its due in a few days... YIKES!!! ..... and was having a hard time deciding what to make for this swap. 

Earlier this week, I went to a friends home who had invited a bunch of us over for a day of scrapping, chatting and eating.  Well, my birthday was on Tuesday and I've been staying up late doing all sorts of things... so I finally showed up around 1230 ish... ok... it was more like 1pm.  LOL!  Who am I fooling.  Her hubby created a scrapbook room for her, so I had to go take a look.  We were scrapping in the kitchen at a big table.   She also sells CTMH stamps, so while in there, of course I had to take a look.  I told her I was looking for a fun birthday stamp and we searched til I found just the right one.  I also went home with a lot of other ones that she let me borrow to stamp.  She mentioned that she was getting pegboard to put on one of the walls.  I told her not to get any.  She gives me this look ... as if to say "why not".  Well, over a year ago, I went to Lowe's and got some peg board.  I had it cut to size and also board some other wood to back it with so it would sit off of the wall.  I spray painted it white.. and there it has sat on my floor all that time.  I ended up using that wall space for something else ... so we made a trade for it.  Everything works out well in the long run.

So here's the card I did for the swap.  Shhhhhhhh, don't tell cause I don't want them to see it yet.  LOL!  Yeah right!  I finished most of these last nite at the LSS midnite mania.   Had to wait til I got home to attach the sentiment since the printer there was out of ink.
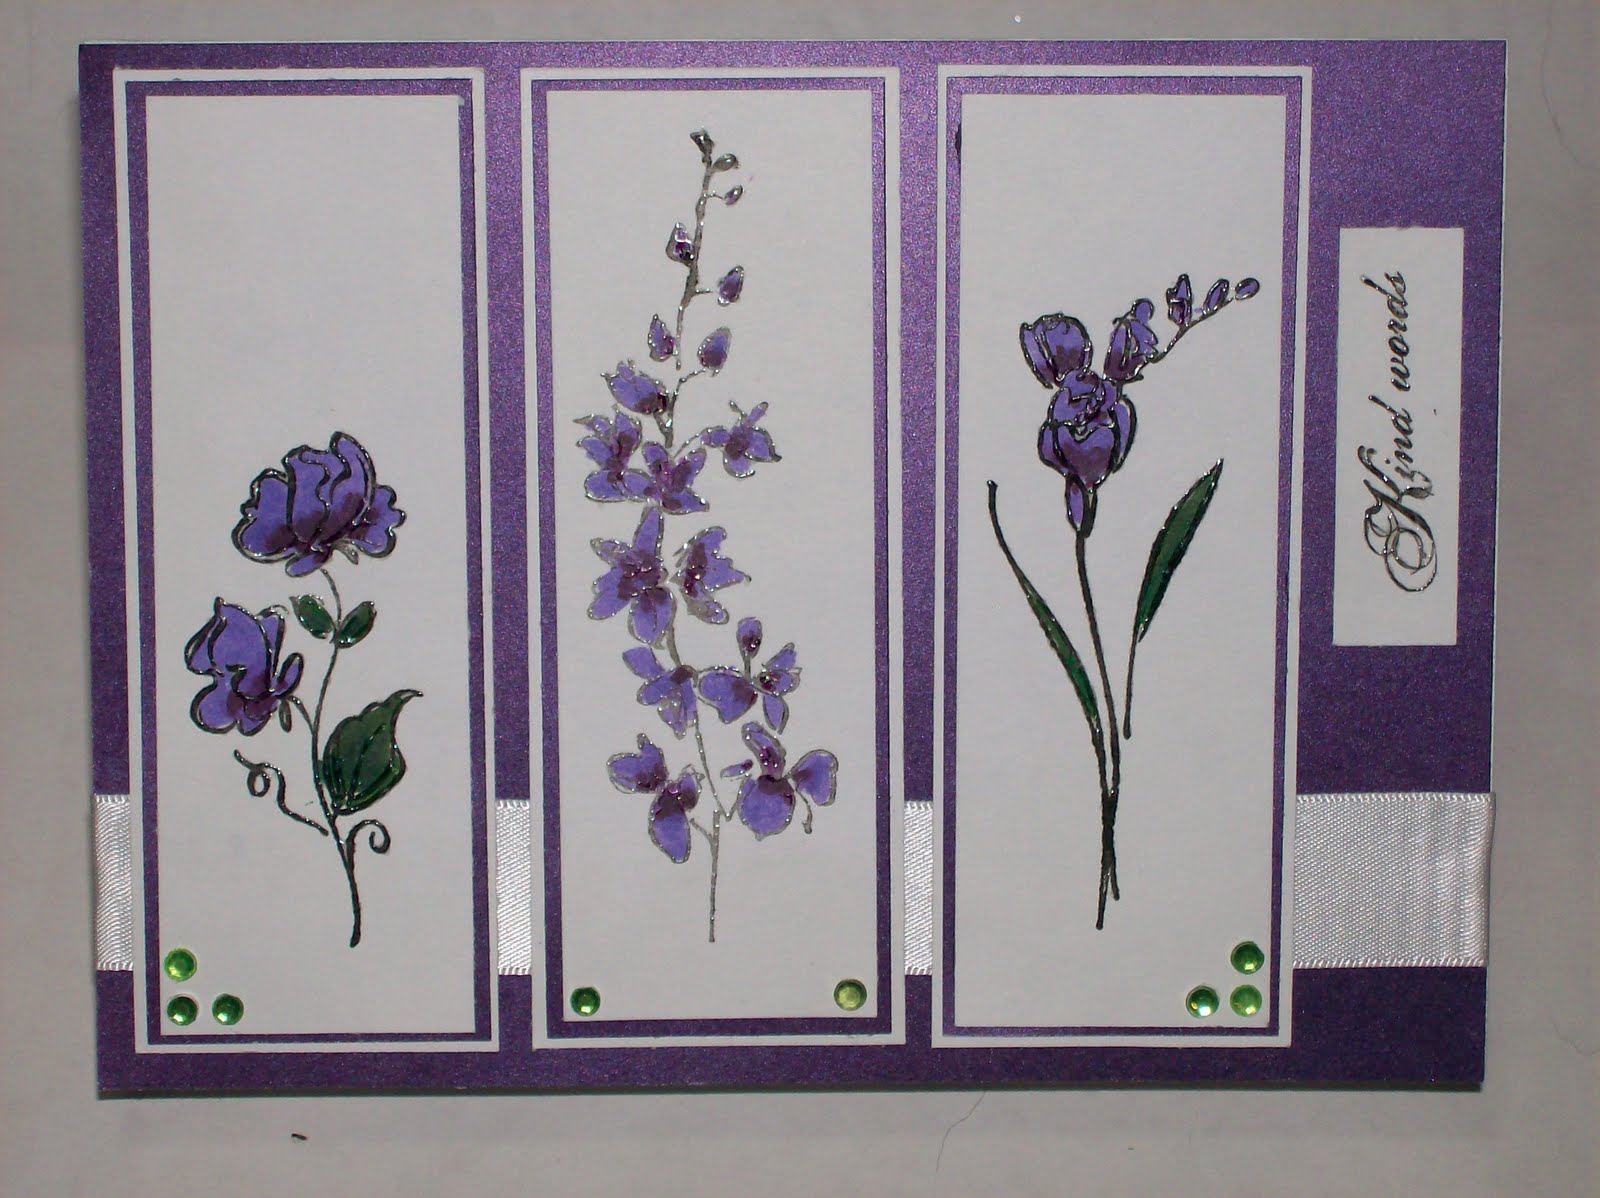


Recipe:
Penny Black Stamp - Toadily Yours
Copic inks
AC Paper - Cardstock and Patterned
Ribbon from my stash
Computer Generated Sentiment


Then I had stamped all of these images that I have from company called Stamp Affair .  Since I knew I was going to be working on cards all night, I went prepared.  This is what I ended up with after 5 hrs of scrapbooking.
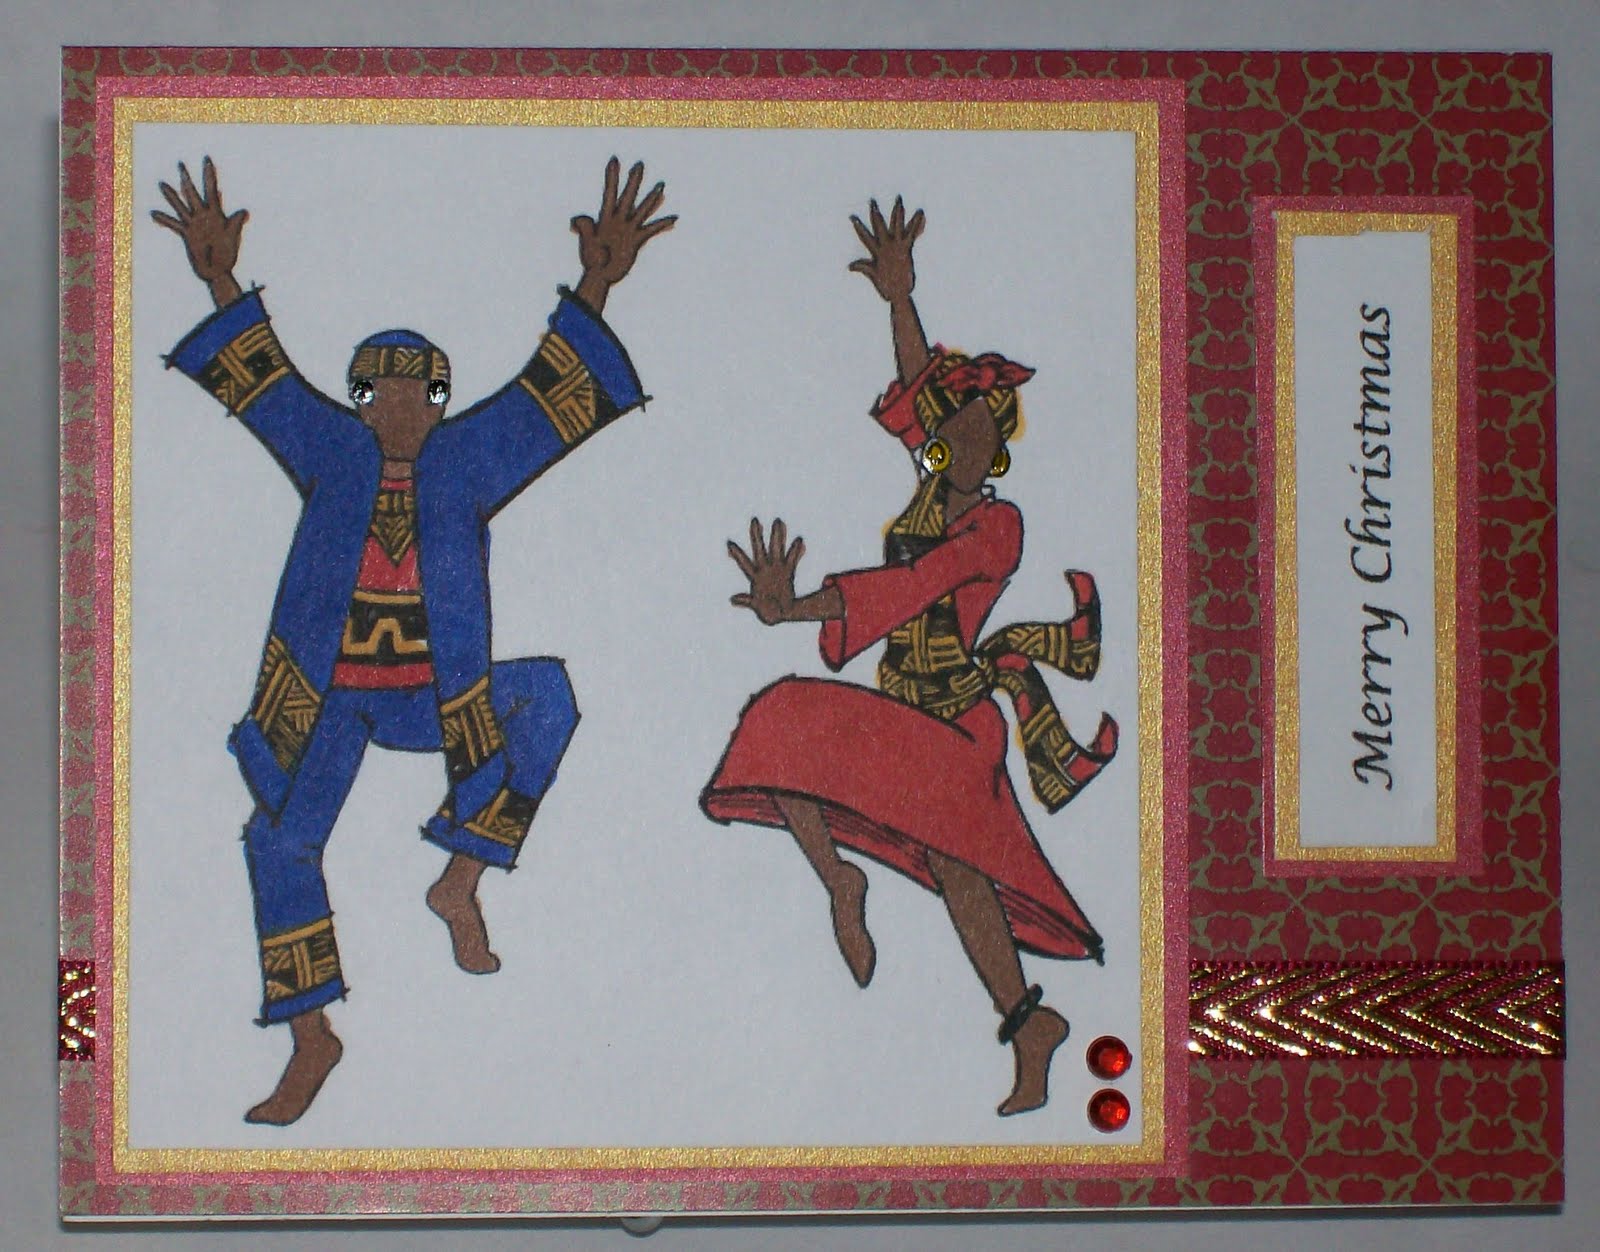


Recipe:
Heritage Collection Stamp - Tiger Wrap
Copic Coloring
DCWV African Safari Stack
DCWV Shimmer Stack
Rhinestones
Ribbon from my stash

The following cards are made from a Rubbernecker Stamp . 


Recipe:
Rubbernecker Stamp: Shantay
Rubbernecker Stamp - Sentiment
DCWV Shimmer Stack
Patterned Paper - Various (DCWV, Basic Gray, AC)
Copic Coloring
Rhinestones

A Layout Challenge

One of the Sistah's on the SOC website posted a 2 week layout challenge on her blog... Jazzy Paper .  So I had time this weekend after working on some other cards for another swap and decided to give this one a go.

After finding a stamp in my stash this weekend and doing a lot of copic coloring with it, I decided that this was the one for this challenge.


Recipe:
Stamped image : Tiger Wrap (Heritage stamp)
DCWV - Red Shimmer Paper
Coredinations Gemstones White Cardstock
Craft Essentials Flower
Adhesive Ribbon
Rubon Letters - Simply Sweet from Doodlebug Design
Copic Inks - N3, R46, E25

Wednesday, July 21, 2010

A Mini Mini Purse Album

I had this idea stuck in my head all day.  So when I returned from my outing today, I sat down and started to work on this.  Sometimes, I just can't stop til I get something finished.  With the exception of the dangling bling that I need to add to this, I think this turned out pretty nice.

This was cut at 4.25" x 3" .

The handle was one that I created from my leftover bead stash from my jewelry days.


And here's a comparison of the full sized purse to the mini-mini.


Recipe:
Chipboard
Outer Patterned paper from Joann's - Sand Rain Drops
Inner Patterned Papers - DCWV Rustic Stack
Bazzill Flowers
Rhinestones
1" Binder Rings
Eyelets

Tuesday, July 20, 2010

Mini Purse Albums

I am in love with creating these!  Not too long ago, Kathy from Paper Phenomenon posted a kit for Mini Purse Albums.  I looked at what she did and said "Wow"... Amazing!!  She does some incredible work and I'm not sure when she finds the time to do all of her creating since she does work a full-time job.

So anyways, the day that she was doing the online video stream tutorial, I wasn't home.  But later on, I went back and reviewed the Ustream video so that I could follow along and create my mini album.  I sat down and created my first one...


It now has a nice embellishment on the front.... just didn't feel like retaking the picture.

I liked the way it came out, so this weekend, I created 2 new ones.  These will be for gifts.

This green paper looks just like alligator skin.  I found a different button for this green one... but put the flower on there as a place holder.  Again... I'm too lazy to retake the picture.

And this one.... I really love.  I might have a hard time parting with it , but I know it will be truly loved.


and check out the inside of this one.  I just love it.

Recipe:
Chipboard
Patterned paper from Joann's
Purse Handles .. from Joann's
Embellishments ... from Joann's and Michaels
Binder Rings
Eyelets


Sunday, July 18, 2010

A New Baby Card

My grandson's mother just had a new baby via emergency C-section on Thursday.  She was induced, but complications arose.  Yesterday, I picked up my grandson from her mom for my son... whew... that was lengthy.  I told her that I would bring the little man there to see his mom today for a brief visit.  No, this is not my newest grandbaby.  LOL!

So being the person I am, I sat down this morning and made her a card.
On one of my favorite websites, one of the ladies shared a link to a Triple Tier Slider Card ... so I went to check it out.  She also had a video of how to put it together.  You can find it here .... Stamp With Heather

So here's what I made:


Recipe:
SU Stamp and Sentiment
MS Cardstock
Nana's Nursery Baby Boy Stack
Bic Mark It Markers

Saturday, July 17, 2010

Another Take on the Buried Treasures Challenge

I'm still wide awake when I should  be sleeping... so what better thing to do than to make another card.
Here's another take on the Buried Treasures Challenge.

This time I used all of the stamps in the SU set Echoes of Kindness.

I took part of the sentiment for the front of the card and then used the rest on the inside:


Recipe:
DCWV Shimmer Stack
SU Set - Echoes of Kindness
BIC Mark It Markers
White Ribbon from my stash
Rhinestones

Buried Treasures Challenge

I was up late chatting with some scrappy friends on the SOC website and decided to get scrappy while chatting.  Of course , it takes longer to get something accomplished... but you can get it done.

A challenge was posted at the beginning of the month to find some buried treasures in your home that you'd not used.  Some people buy things because they need them right then and there, and there are others that buy things just because.  I'm both of those people.  I'm a tool junky and gotta have them regardless whether I use them right away or later on down the road.

Well, this week, I went in the depths of my spare bedroom where I had stashed my jewelry supplies ... looking for my pliers that I needed to put a clasp on a mini album that I've been working on.  As I was stepping... or shall I say... climbing from the other side of the bed.... I spotted these bags.   So of course I had to take a look and see what they were.

In one bag, there were 2 brand new, unopened Cricut cartridges.  I don't know when I put them in there and why, because my cricut machine is in my craft room.  I'm ashamed to say when I bought them for I truly had forgotten that I had them and had repurchased those 2 cartridges.  In the 2nd bag, there were 4 EK success punches.... 2 of which I must have used because they weren't in the packaging.... lol... thats a good sign.  The 3rd bag contained 7 sets of SU stamps.  One of the sets had been used and the others were still never assembled.  I found that one of the stamp sets... I had previously purchased and didn't realize that either.   But its all good, because I had hosted the SU party and the duplicate stamp set was a freebie (eventhough now that I think of it, I could have gotten something else... oh well.)

So my buried treasure that I used was one of the SU stamp sets called Echoes of Kindness.  I went to the Split Coast Stampers website to do a search on that set for some inspiration.  I found lots of good possibilities.  This one really stuck to me.  One of the techniques on this card in addition to using the stamp, was a technique called Lattice Folding.  I'd not seen that before and thought I'd give it a whirl.  It led me to a tutorial on how to do the lattice folding .... and you can find it here... Lattice Folding Technique .

So here's my card created from my buried treasure:
The stamping was done with pigment ink and embossed with Utee embossing powder, then colored with BIC mark it markers.


Then I decided that it was missing something, so I went back and added some bling:


Recipe:
DCWV Summer Stack patterned paper
Regular Cardstock from my stash
SU stamp set - Echoes of Kindness
Rhinestones
Ribbon: Prestige (M's Dollar bin ribbon)
BIC Mark It Markers for the coloring of the stamp

Friday, July 16, 2010

A Recycle Challenge

Just trying to keep myself busy these days.
Over on the SOC website, there was a challenge posted in which you are to use something in your household that can be recycled.  A while back, someone had asked me to save some toilet paper rolls and I did.  Then threw them out when they changed their minds.  So, I once again decided to save some to try my hand at a mini album.  This was the perfect challenge.

The hard part was deciding on what to make this for.... which I still haven't as yet.  So, there aren't any embellishments put on this one yet.  I'm thinking I might use it for a baby mini album.


Recipe:
Empty Toilet Paper Rolls
Patterned Paper: DCWV Linen Closet
Background Cardstock: Martha Stewart
Miscellaneous Ribbon
Tsuneiko Inks

Monday, July 12, 2010

A Birthday Card

A friends Birthday was at the beginning of the month, so I made her this cute card. 
I'm having so much fun using my Copic markers.
I used another Rubbernecker stamp for the image and I think I did her justice.  I stamped her on the bottom... then colored her in on another image... cut her out and pop dotted her up off the paper.


Recipe:
Rubbernecker Stamp : Helika
DCWV Indian Summer stack
Ribbon from my stash
Big Bazzill Flower and Brad
EK Success punch

Christmas in July Swap

Whoa!  I just realized I'd not posted anything in almost a month.  I've been a bit busy and behind in things.

On the Scraps of Color website, I decided to do the Christmas in July card swap.  I switched what I was going to create many times over.  I finally pulled out some stamps I have by Rubbernecker and put two of them together for the image.  Took my time and colored them with my Copic Sketch markers.

So here's the final product:


Recipe:
Rubbernecker stamps: Trevon and Larhonda
Patterned paper: Little Yellow Bicycle
DCWV Shimmer stack for Red and Gold papers
Miscellaneous Ribbon
Red Adhesvie Rhinetones
Sentiment printed from computer

Friday, June 18, 2010

A Little bit behind in posting

Hey There!
Now, I have been creative, but I've been a bit lax these past 2 weeks in updating my blogspot.  I had some challenges and swaps to get done, packages to mail and just all around busy as all get out.

So here's some of the things I've worked on recently.
On the SOC group, one of the ladies had asked if we could make one of two cards for her sons troop that was just returning from Afghanistan.  So I did.


Then there was another challenge in which you were asked to make a card using those little Studio G or $1 stamps.... and to add some bling and stickles.  I did one and embossed it... used those skittle beads and realized I'd not played by the rules.  So I pulled out another one and did as I should have the 1st time.


And then , there was one last challenge that I entered.  You were supposed to create a card using 8 circles.  So this is what I came up with.


So as you can see, I have been busy being creative.

Thursday, June 3, 2010

The Outfit that plagued me! LOL!

Thanks to all of you who have heard me moan and allowed me to vent over the past few days. You know who you are.


Today, I finished and sort of delivered an outfit for an elderly neighbor at my mom's apartment complex. About 5-6 wks ago, I guess my mom told her that I sew.... so she caught me one day while I was at the complex. She wanted an outfit made. I told her that I didn't have the time right then, but when I freed up some time, I would let her know. Mind you, I've not sewn anything in quite a while.


Mom was a seamstress and taught me most of everything that I know about textiles and sewing all sorts of things. Thank you mom! Up until about 10 yrs ago, I used to sew most of my clothing. Then I got into other crafts, and sewing got pushed to the back burner.

Well, last week, I get to moms apartment and the neighbor comes over and says "I need this outfit made and here is the material". Not trying to make money off of her, she tells me its a pair of pants and a top. How much will I charge her? So off the top of my head, I say $20. She says, I don't need it right away. I ask for the pattern and she leaves to go get what I thought was the pattern. She returns with a pair of pants and a top and says "I want it made like this". In the words of my Southern girlfriend "Bless her heart".


Being the person that I am, I say ok. I'll see what I can do. Well, the shirt, pants and material sit on the back of the chair for a week while I'm figuring... I got lots of time to do this since she said she didn't need it right away. On Sunday, she stops by and says... do you think you'll have it done soon. LOL! I'm going out of town on Friday and I'd like to have it for my trip. So I say yes, I'll get it done. Grrrrrrrrrrrrrrrrrrrrrrrr! So for 2 days, being it was a holiday weekend, I didn't touch it. So on Tuesday, I take it home and on Wednesday, I pull everything out and am thinking.... what did I get myself into. I cut things out and begin to sew it up. I go to my moms that evening and have it with me to do a fitting on her.


She tries it on and the pants are about 4 inches too long. I said... I made it exactly the same length as the pants you gave me to pattern this after. Are those pants too long on you? She smiles and says 'Yes'. So I just grin. Double Grrrrrrrrrrrrrrrrrrrrrrrrrrrr! So I mark the adjustments and tell her I'd have it ready today for her. I wake up early today and have some other things to do and some runs out of the house. I return home to finish the garments to take to her. In the meantime, I'm still doing other stuff. I finally finish about 8ish this evening. By the time I get to the complex, its around 9pm. My mom says... she came by looking for you. I said I've been calling you. She says... the phone never rang. Triple Grrrrrrrrrrrrr! Thats another story.


I go to her apartment and can't get her to open her door, so I call another neighbor and ask her if she is going to be up early. She says yes, I usually take Nicky (her dog) out about 7:30am. I said can I bring you this outfit so that she can get it from you early. Mom will not be up. I'll put a note on her door to tell her to come to you unless you see her first. Not a problem.


So, I sort of delivered the outfit.
And I am so done.


Wednesday, June 2, 2010

I'm on a Card Kick!

Ok... I know I have other things I should be doing, but I'm still getting my card stash up to snuff so that I can have a card ready at my fingertips.

I found this great Guitar player image and had to give it a whirl.  I wanted to do a masculine card... which is hard to do.  I think the papers here work really well with the image.  I'm stuck on a sentiment for the card, but put this one on there as a place holder.


Recipe:
DCWV Patterned paper
Copic inks
Smooch Inks
Studio G Soloz Sentiment


Tuesday, June 1, 2010

A Lady Sings the Blues

I was looking for through my images for something else when I ran across this image of Billie Holiday.  I love it.  I'd forgotten that I had it and thought today was a good day to put it to good use.
So, once again, I'm practicing my copic coloring... need some more colors to blend evenly with, but eventually, I'll get them.

The patterned paper is from the DCWV Music Stack.  I thought it was perfect for this image.


Recipe:
Billie Holiday Image
DCWV Shimmer Stack
DCWV Music Stack
Copic Inks
Smooch inks

Monday, May 31, 2010

More Copic Coloring and such

I'm having a ball stamping with my new African American lady stamps from Rubbernecker.    Decided to be a bit more productive today and work on some more of my card stash.  I decided not to put any sentiments on the cards, so that I'll have a card blank when I need to ... and I can add the appropriate sentiment later.  So, what I've been doing is putting some matching cardstock with the card inside the envelope for use later on.

Here's the 2 cards I did today before going out:


Ayana


Shenice
(Those rhinestones are actually purple, but they are appearing blue.  I will probably change them out for a different color.)

Recipe:
Rubbernecker Stamps - Ayana, Shenice
Copic inks - for the skin tones, lips
Smooch inks - earrings and necklaces
DCWV Shimmer Stack
DCWV Indian Summer Stack
Rhinestones
Misc ribbon from my stash

Saturday, May 29, 2010

Sketch Challenge with a Twist - Using Red, Black and White Cardstock

Over at the Scraps of Color website, one of the challenges this week was to use Tiare's sketch to create a card using the colors Red, Black and white.  Since I'd just recently gotten in some new African American stamps from Rubbernecker Stamps, I've been testing them out using different coloring and techniques.

I'm still learning to use my Copic inks... and I know I need to add some colors so that I can blend and shade properly... but til then, I'll use what I have.

So this is Breyona again decked out in Black Diamond stickles.  I used a DCWV glitter stack, Red and White Bazzill cardstock, the sentiment is one from SU that I've had for a while, Copic inks, smooch inks, flowers (bridal section from Michael's) and some rhinestones.


Here's a close up view.

Recipe:
Breyona Image (Rubbernecker Stamps)
Marvy Puffy paints
Smooch inks (lips and earrings)
Copic inks (Body, necklace)
Black Diamond Stickles
Rhinestones
White Flowers (Michaels Bridal section)
Bazzil Cardstock (Red and White)
DCWV Glitter Stack (Patterned Papers)
SU Bubble Queen Set (2005)

Friday, May 28, 2010

New African American stamps by Rubbernecker

 I'm so excited.  I got my new African American stamps by Rubbernecker.  They come unmounted, but on a cushioned backing that sticks to my acrylic blocks.  I love em.

I am currently making cards to fill up my stash so that I don't have to rush at the last minute to make one up.  Sometimes I don't add a sentiment so that I can do that when I actually need a card and not necessarily the sentiment that is on it.

Here is the first of four of the new stamps that I just acquired - Breyona.  She's beautiful.  I just love the curls in her hair.

I decided to color her skin tone with my copic pens.  I used Smooch inks for all of the other colors.  I used my Marvy puffy paints in black for her hair.

I backed the image with DCWV Shimmer Stack.  The patterned papers are from SEI Addison.  The border punch used is an EK Success punch - Scrolls and Dots.  Of course, one has to ink the edges and this was done with Tsukineko Memento Dew Drop Dye Ink.    Added a little dotted ribbon and you know, I have to add a little bit of Prima flowers. to offset things with a brad center.


Recipe:
Breyona rubber stamp
Marvy Puffy Paint
Copic Ink
Smooch Inks
Tsuineko Memento Dew Drop Dye Ink
SEI Addison Stack
DCWV Shimmer Stack
Prima flowers
EK Success Scrolls and Dots punch
Ribbon

Saturday, May 22, 2010

Handmade Satin Flowers

While browsing one of my favorite blogs a while back...  Paper Phenomenon ... Kathy Orta had shown some satin flowers that she had made.  They are all over Youtube right now... creating flowers of all sorts .. using various different media.  So I looked through my fabric stash and pulled out some material that I had hidden away.  Decided to try my hand at making some flowers.  They call them "Lollipop" flowers... but I don't know why since they don't look like lollipops to me.  Maybe I'm missing something.  LOL!

This past weekend, I was at my local hangout.... Making Memories Unforgettable ... otherwise known as MMU to us locals.  I bought my little lighter and some material with me and began to show my scrapbook buddy about a new technique in making flowers.  She's pretty much a flower ho and I enable her habits.  I keep a look out for all things flowers for her while out browsing the stores.

There was a little girl there scrapbooking with her mom ... I believe she told me that she was 6 yrs old.  She was working on her own scrapbook page and had all of these flowers that she was putting together in different combinations.  So being me, I went over to see what she was doing and complimented her efforts.

When I was showing how to make the flowers, she came over to my table with her mom to look at what I was doing.  After I finished assembling one of the flowers, I gave it to her for her stash.  She thanked me for it.  Soon after, she was back at my table offering me one of her flowers.  I thought it was sooooo sweet... that I told her we'd just shared our first "swap" together.  She was such a joy.

Well, anyways, here are the flowers that I put together late tonite while watching tv.  I finally found the sixxiz circle die that I wanted since the ones I made over the weekend were free-hand cut.  I'd rather do things the easy way if all possible... and boy was it a breeze to cut them with the die.

Recipe:
Sizzix Circle die
Satin fabric
Fabric Tack Glue
Rhinestones


So, I needed to edit this posting to include a comparison of different ways of making these satin flowers.  The original version, I used a small grill torch (one of those candle torch's that you can use indoors.  Now, I thought there was another version and couldn't find it at the time.  Someone else had experimented and found that if they used a heat gun, they could shrink the satin this way also.  now it takes a little bit longer to do... but the effects are just the same... and the flowers come out a bit tighter.  Elizabeth  from the Cricut Messageboard did a video on how to do this...... go here to view it.

Here's the final product comparison.
On the left are the ones done with a heat gun and on the right are the ones made with fire.


Related Posts Plugin for WordPress, Blogger...